PLEASE NOTE: Work is in progress to add Wix/Squarespace compatible documents to each kit. Completed kits are:
![Cervicogenic Headaches [Blog Post Kit]](http://facetdigital.co.uk/wp-content/uploads/2022/03/cervicogenic_-1-300x300.png)
![Fibromyalgia [Blog Post Kit]](http://facetdigital.co.uk/wp-content/uploads/2022/02/fibro-300x300.png)
The kits are best suited for WordPress users, but they will work well for sites using other blogging software too. Squarespace and Wix are relatively popular and user friendly, but they do lack the features that WordPress offers. In your kits, you will find a couple of documents: the one ending with .txt is the HTML file. The Word document is the one you’re after if you use Squarespace or Wix.
Instructions
- Download your kit as a zip file
- Open the Word document, and copy the whole thing. You could write your whole post in Word and then copy it if you prefer, but you might find it easier to format as you go from within your website.
- Paste it into a new blog.
Headings
This is where you need to start tweaking things. Both Wix and Squarespace fail to interpret headings properly. Instead, both just put the text on a new line and make it bold. Visually, it just about does the job, but your site will have a better looking option. Search engines understand headings too, so they can make more sense of your site. Keywords in your headings are more valuable from an SEO perspective than keywords in the body of the text (which is how they will be interpreted, even if they have their own line and show as bold.)
Squarespace gives you the option to use Heading 1. Don’t use this, as H1 should be reserved for your post title only. Instead, use H2 for your top level headings (unbold the text for consistency if you’re on Wix). To do this in either program, highlight the heading and change it from “paragraph” to “Heading 2”.
If you want to break up your sections further, follow the hierarchy. The section of text you’re reading right now is under the H2 called “Instructions”, but within that there’s an H3 called “Headings”. Big blocks of text without headings bring your ranking down, but they’re also harder to read. Wix offers you H2-H6, and Squarespace offers H1 (ignore it!) to H3. There is a “code” option in Squarespace, shown below:
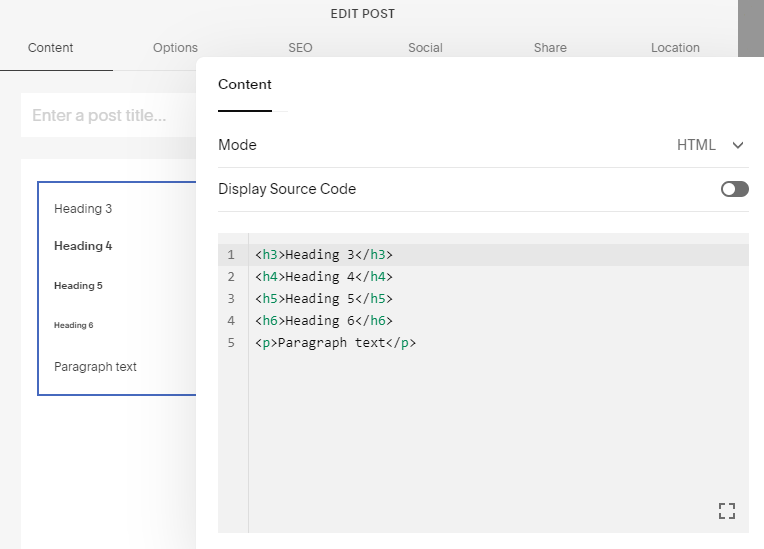
Access this by pressing the + to create a new block, then choosing “code”. It’s automatically set to HTML, so you can simply type <h4> and it will understand. It will also close off the tag for you, so the </h4> automatically appears as soon as you’ve set the opening one. However, as you can see, these headings simply get smaller, quickly becoming smaller than the paragraph text that they’re heading up.
It’s unlikely you’ll need that many layers in a blog post, but worth knowing the workaround if you do want to use them. To learn the basics of HTML headings, I will always recommend W3Schools.
Images
In the Word document, I’ve substituted the code for the image with some grey coloured text, as neither software can paste an image. You have to insert an image manually, but it’s quite simple. For Squarespace, click the + to make a new block and choose “image”. For Wix, click “Add” and choose “image”. Upload the file from your computer and it will appear.
Images make more sense to search engines if they have an “alt tag”. This is a little description that helps to identify the content of your image. Years ago it often used to show when you hovered your cursor over an image, and some people do still read it so it’s good for making your site accessible. Make sure your keyword is in there, and keep it short and sweet.
We know that links are important for SEO, so adding one to your image is a good idea. You might like to use an internal link, such as your booking page. Or you might like to use an external link, in which case you’re more than welcome to link back to https://facetdigital.co.uk
Squarespace makes this all easy. When you upload the image, the alt tag and link options are immediately below it.
To add an alt tag in Wix, click on your image and a tool bar will appear at the top. Click the cog wheel, then fill in the alt tag. To add a link, click the link icon instead.
HTML Limitations with Squarespace and Wix
HTML can seem intimidating, and you can get by without it. But spending even a few minutes just learning to understand the basics can give you a lot more control over how your website looks and behaves. If you’ve got to grips with the heading tags, you might also be interested in learning basic image coding. Then you can learn the tag to make anything a link: you can put your image code within here and make the whole thing a link. It means you can bypass all the faffing around with finding buttons and just instead the code- but Wix and Squarespace have proven themselves to be sub-par for this. Blogging software all speaks a range of similar languages, but HTML is the one you can’t escape from.
My experience with Wix and Squarespace has been relatively superficial, but I haven’t come across any equivalent to WordPress’ plugins. These are often community made packages that work like a little program within your website. Yoast is an example, as are spam filters and other useful bits and pieces. These things just make your life easier, and personally I’m not interested in working harder when you can get it all for free! In 2021 over 455 million sites used WordPress out of around 1.3 billion sites in total. The numbers speak for themselves!
If you’re falling out of love with Wix or Squarespace, I recommend speaking to Alan at Osteohustle about moving over to WordPress.